Introduction to DIY Caramel Apple Bar
As the leaves begin to turn and the scent of autumn fills the air, there’s no better way to celebrate the season than with a DIY caramel apple bar. It’s an engaging and delicious way to bring friends and family together. Picture this: a table adorned with an array of fresh, crisp apples and an assortment of toppings—each person creating their masterpiece. The fun lies in the creativity involved, allowing anyone to customize their apple to fit their unique taste.
Why a DIY Caramel Apple Bar is Perfect for Homemade Fun
Hosting a gathering with a DIY caramel apple bar is easier than it sounds and is sure to impress. Whether you’re planning a cozy family night, a lively Halloween party, or an outdoor fall festival, this setup offers something for everyone. Imagine the smiles as guests dip their apples in gooey caramel and sprinkle on their favorite toppings.
Here are a few reasons why this idea is such a winner:
-
Customization: Each guest can create their own combinations. From classic nuts and chocolate chips to more adventurous options like crushed pretzels or toasted coconut, the possibilities are endless.
-
Engagement: With everyone partaking in the preparation, it fosters a sense of community. People love sharing tips and tricks, maybe even reminiscing about their childhood experiences with caramel apples. Creating memories becomes as important as the delicious treats themselves.
-
Easy Cleanup: After the fun is done, the cleanup is simple. No elaborate dishes are involved—just a few bowls and utensils. Plus, guests can take their creations home, ensuring leftovers don’t go to waste.
A Touch of Tradition
Did you know that caramel apples date back to the 1950s when candy companies looked for ways to promote their products during Halloween? It’s a tradition that’s evolved but remains a beloved custom. For inspiration on creating your own bar, check out this link for ideas that cater to various tastes and dietary preferences!
Consider crafting a DIY caramel apple bar as a way to connect, create, and indulge in fall flavors, all while making your get-together memorable. Trust me; once you set it up, the laughter and joy will flow as freely as the caramel!
Ingredients for DIY Caramel Apple Bar
Creating a DIY caramel apple bar is not just a delightful experience for your taste buds; it’s a fun way to get creative with friends and family! Here’s what you’ll need to set up your bar and make it a hit:
Fresh Apples
- Varieties: Choose a mix of sweet and tart apples like Fuji, Granny Smith, or Honeycrisp.
Rich Caramel Sauce
- Homemade or Store-Bought: You can make your own caramel sauce for that gourmet touch, or opt for a quality store-bought version for convenience. The caramel consistency is crucial for a great coating.
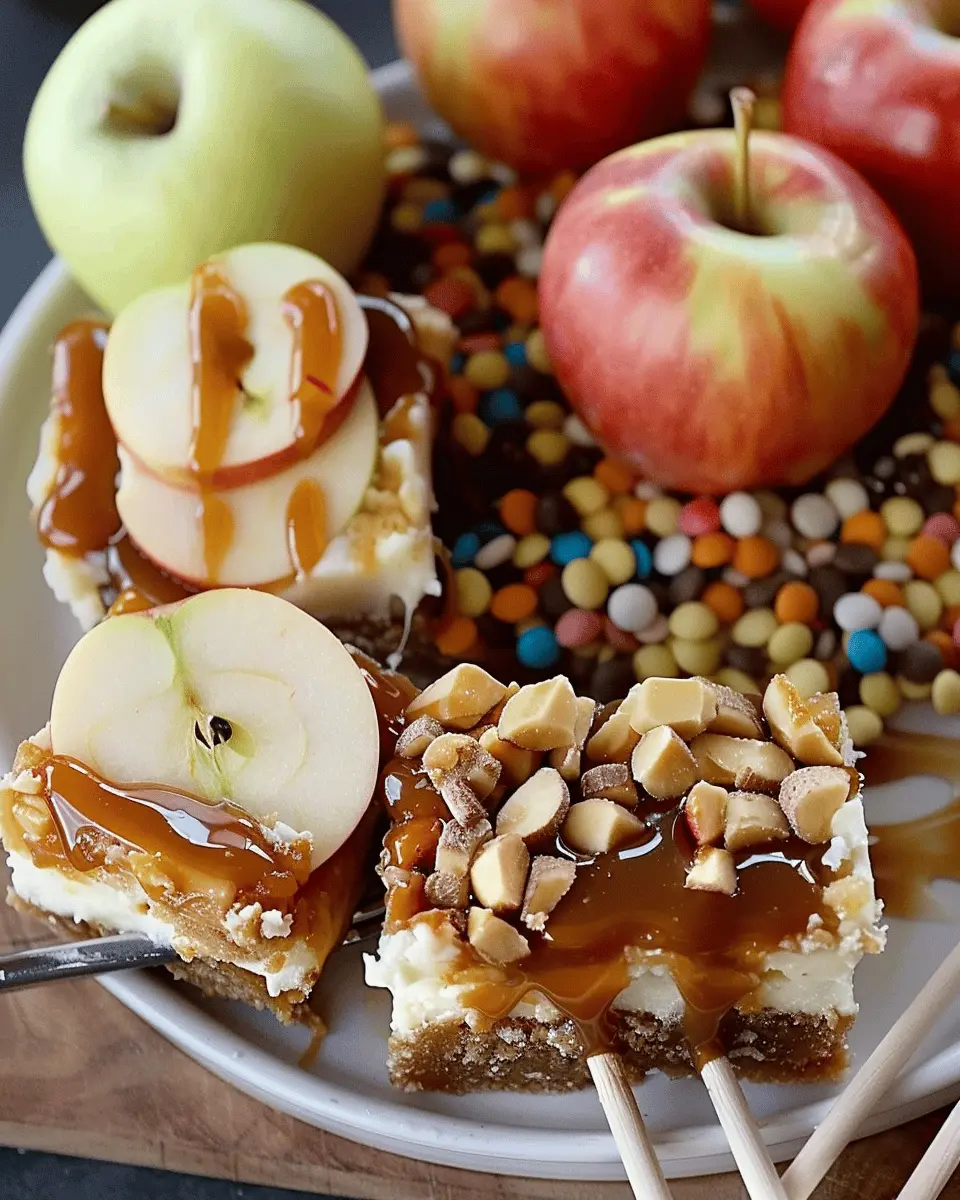
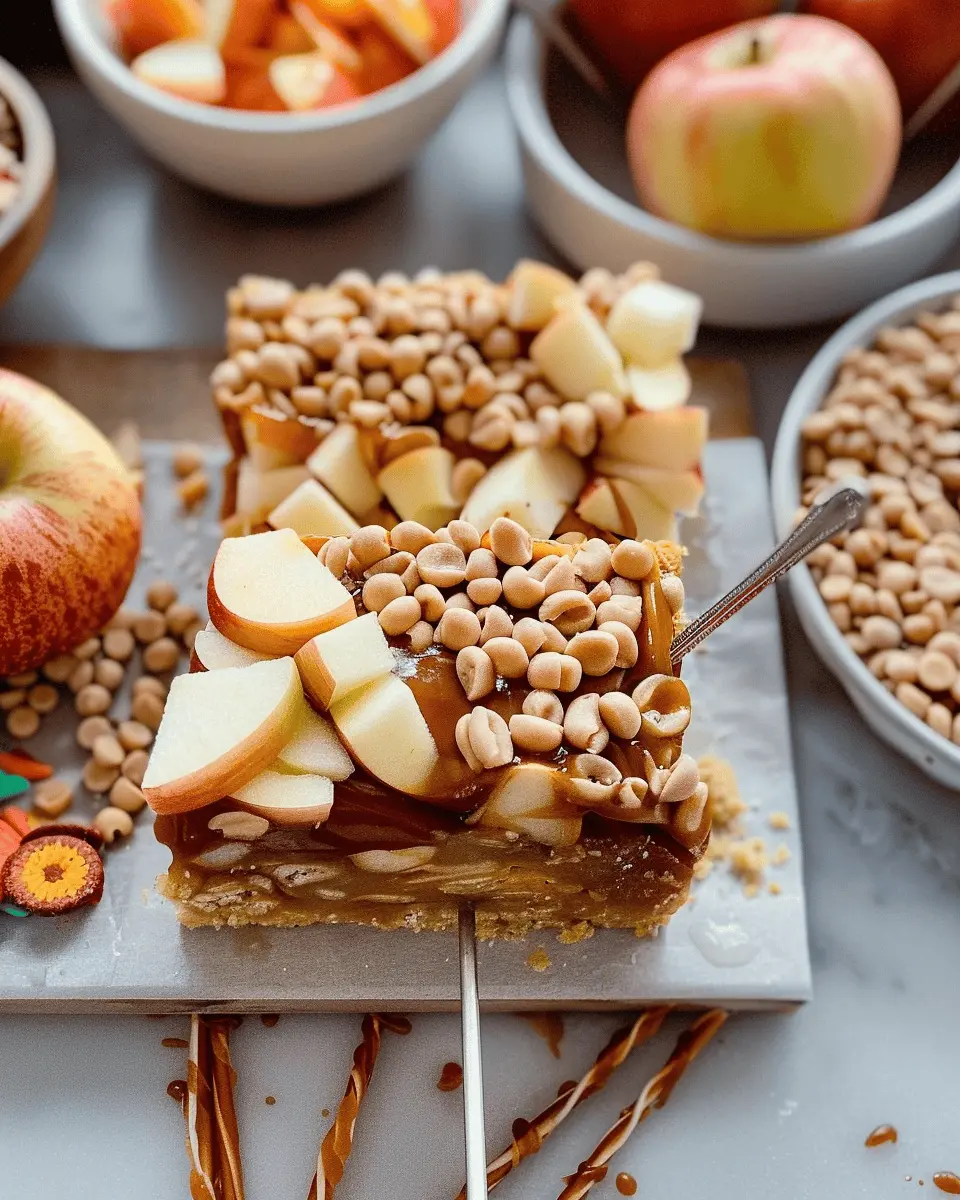
Toppings Galore
Create an exciting topping station with:
- Chopped Nuts: Peanuts, almonds, or walnuts add a nice crunch.
- Candy Pieces: M&Ms, crushed Oreos, or gummy bears will appeal to the kids (and even adults!).
- Sprinkles: Colorful sprinkles can add a festive flair.
- Chocolate Drizzle: A drizzle of melted chocolate will make your apples look irresistible.
Having a variety of toppings keeps things interesting and allows everyone to customize their creations. Wouldn’t it be fun to see whose apple looks the best?
For more inspiration on toppings and recipes, check out sites like Taste of Home and Food Network. They offer a plethora of ideas and variations to take your DIY caramel apple bar to the next level!
Now, gather these ingredients and let’s make sweet memories!
Preparing the DIY Caramel Apple Bar
Creating a DIY caramel apple bar is the perfect way to celebrate the changing seasons or just indulge in a fun, interactive dessert experience. With a variety of toppings and flavors, everyone will find their favorite combination. Let’s dive into how to prepare this delightful treat!
Gather Your Ingredients
Before you jump into the fun of making your DIY caramel apple bar, it’s essential to gather all your ingredients. This way, everything is in arm’s reach when you’re ready to create those delicious caramel apples. Here’s what you’ll need:
- Fresh apples (Granny Smith, Honeycrisp, or your favorite variety)
- Caramel sauce (store-bought or homemade)
- Toppings (think chopped nuts, sprinkles, mini chocolate chips, crushed cookies, or even pieces of turkey bacon for a salty-sweet combo)
- Sticks or skewers (to hold your apples)
- Optional: melted chocolate for drizzling
Prepare the Apples
The star of your DIY caramel apple bar is undoubtedly the apples themselves. It’s crucial to start with fresh, crisp apples that can hold up under the weight of all that caramel and toppings.
- Wash and Dry: Rinse the apples thoroughly to remove any wax or pesticides and dry them well. This step is critical; excess moisture can cause the caramel to slide off.
- Insert Sticks: Use wooden sticks or skewers for easy dipping. Push the stick into the center of each apple, going about halfway through.
- Optional Flavor Boost: If you want to add a touch of flavor, consider soaking your apples in a mixture of water and lemon juice for about 5-10 minutes before drying.
Melt the Caramel
Now, onto the gooey goodness! Melting the caramel can be executed in a couple of ways, depending on your kitchen setup.
- Stovetop Method: In a small saucepan over low heat, stir caramel candies or prepared caramel sauce until smooth.
- Microwave Method: Pour the caramel into a microwave-safe bowl, and heat in 30-second intervals, stirring in between, until fully melted.
Pro tip: Adding a touch of cream or butter can create a smoother texture, helping your caramel cling to the apples perfectly.
Set Up the Topping Station
A well-organized topping station will transform your DIY caramel apple bar from ordinary to extraordinary. This part is where everyone can let their creativity shine!
- Table Setup: Use a large cutting board or platter as your base. Arrange small bowls of toppings such as mini marshmallows, crushed nuts, and sprinkles in an eye-catching way.
- Instructions Signage: Consider using a small chalkboard to write out suggestions for topping combinations, or even a fun menu! This can spark some creativity and excitement.
Excited to try new flavors? Check out FoodNetwork’s article on creative topping ideas for some inspiration!
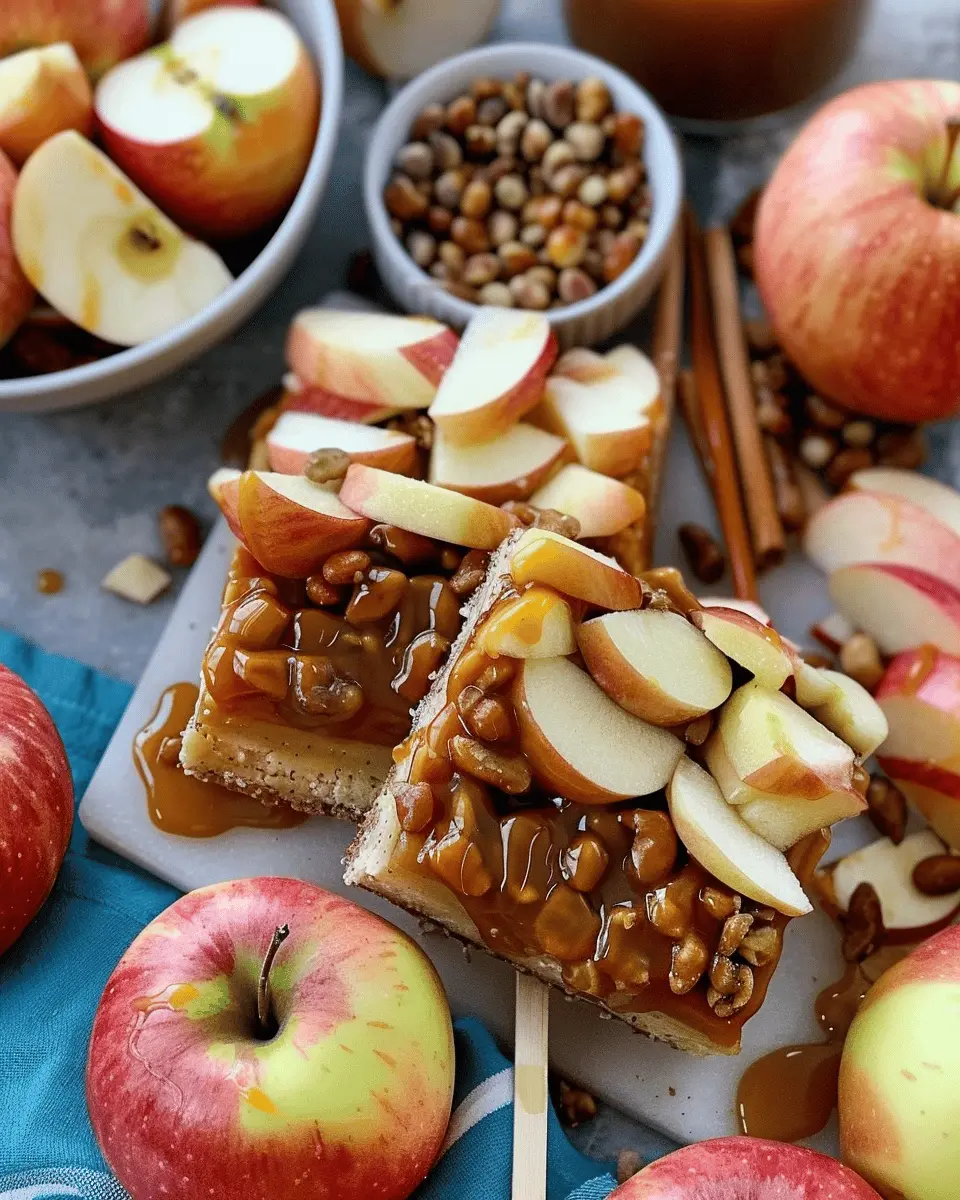
Assemble the Caramel Apple Board
Now comes the most exciting part: assembling your DIY caramel apple bar!
- Coat the Apples: Dip each apple into the warm caramel, allowing excess to drip off. For a fun flair, let the kids shake their apples as they come out to achieve a totally unique look.
- Top It Off: Before the caramel cools, roll the apple in your desired toppings, or allow guests to sprinkle their favorites directly onto the caramel.
- Presentation Magic: Arrange the decorated apples back on your board, and don’t forget to drizzle some melted chocolate on top for that extra indulgence.
Finally, step back and admire your work! The beauty of a caramel apple bar is that there’s no right or wrong way to create—it’s all about having fun and enjoying the sweet rewards of your efforts. Happy indulging!

Variations on the DIY Caramel Apple Bar
Creating your own DIY caramel apple bar opens up a world of delicious possibilities! Whether you’re gearing up for a cozy autumn gathering or simply want a sweet treat at home, consider these fun variations to personalize your experience.
Seasonal Flavors and Toppings
Embrace the flavors of the season by incorporating unique toppings and drizzles. Here are some ideas to get your creativity flowing:
- Pumpkin Spice: Add a sprinkle of pumpkin spice to your caramel sauce or opt for pumpkin puree mixed into the caramel.
- Cinnamon Sugar: Roll your sliced apples in a mixture of cinnamon and sugar before dipping them in caramel for a delightful crunch.
- Chocolate Drizzle: A rich, dark chocolate drizzle can take your caramel apples to another level. Make it festive with a splash of sea salt atop the chocolate.
For more topping ideas, check out Bon Appétit’s guide on apple toppings to keep your bar fresh and exciting!
Healthy Twists on Caramel Apples
Looking to satisfy your sweet tooth without all the guilt? You can absolutely create a healthier version of your DIY caramel apple bar:
- Nut Butter: Swap traditional caramel for your favorite nut butter, like almond or peanut butter, for a protein hit.
- Dark Chocolate: Choose high-quality dark chocolate to melt and dip your apples. It’s rich in antioxidants and can be a guilt-free indulgence.
- Fresh Fruit: Serve apple slices alongside alternative dipping sauces like yogurt or cottage cheese for a refreshing twist.
Remember, making your own DIY caramel apple bar offers endless possibilities, and each variation can cater to different dietary needs or preferences. Who doesn’t love dessert that lets you customize and create? Share your own creations and let your friends get in on the fun!
Cooking Tips and Notes for a DIY Caramel Apple Bar
Creating a DIY caramel apple bar is not only fun but also a delicious way to bring friends and family together. Here are some tips to elevate your caramel apple-making experience:
Choose the Right Apples
Select firm apples like Granny Smith or Honeycrisp; they provide the perfect balance of tartness and crunch that complements the sweetness of caramel. The firmer the apple, the better it holds up to dipping.
Prep Your Toppings
Set up a colorful array of toppings! Consider options like crushed nuts, sprinkles, or even chocolate chips. Arrange your toppings in bowls for easy access — it’s all about making the dipping process fun and inviting!
Caramel Consistency is Key
When making your caramel, aim for a smooth, pourable texture. If it’s too thick, adding a splash of milk or cream during cooking can help achieve that ideal consistency.
Safety First
When dipping apples, keep in mind that the caramel will be very hot. Use a skewer or popsicle stick to avoid burning your fingers.
With these tips, your DIY caramel apple bar will surely be a hit! For more inspiration, check out this comprehensive guide to apple varieties suitable for caramel dipping at Applevarieties.com. Remember, the best part is enjoying the fruits of your labor, so gather your friends and dig in!
Serving Suggestions for the DIY Caramel Apple Bar
Setting up a DIY caramel apple bar is a fantastic way to engage your guests and create a memorable experience. So how do you serve it to make it truly special? Here are some suggestions that will elevate your setup and delight everyone:
Choose the Right Apples
Start with a variety of apples so your guests can mix and match. Consider sweet options like Fuji or Gala, alongside tart choices like Granny Smith. This balance keeps things interesting!
Toppings Galore
Offer a wide array of toppings beyond the usual suspects. Think diced Turkey Bacon for a savory crunch, mini chocolate chips, crushed graham crackers, and even a sprinkle of sea salt for that perfect sweet-salty combo. Don’t forget to include some healthier options like chopped nuts or shredded coconut!
Fun Presentation
Lay all your components out on a long table with bright labels. The presentation adds excitement! For an extra fun touch, include skewers or sticks in a variety of colors for a playful vibe.
Creative Dippers
Instead of traditional caramel, consider providing a few dipping options. This could be luscious chocolate sauce or even a rich peanut butter drizzle. Mixing flavors can lead to exciting discoveries!
Creating a DIY caramel apple bar isn’t just about the food; it’s an opportunity to spark conversations and share smiles. Discover more delicious toppings and ideas at reputable sources like Bon Appétit or Food Network. Enjoy your caramel creations!
Time Breakdown for the DIY Caramel Apple Bar
Preparation Time
Getting started on your DIY caramel apple bar is a breeze! You’ll need about 15-20 minutes to gather your ingredients and prep your apples. Don’t forget to wash and dry them thoroughly!
Setup Time
Once your ingredients are ready, setting up your bar can take another 10-15 minutes. Arrange your toppings—think crushed nuts, sprinkles, or even candy pieces—on a nice serving platter. This is a great time to let your creativity shine!
Total Time
In total, expect to invest around 30-40 minutes to create your DIY caramel apple bar. This includes prep and setup, making it a perfect activity for gatherings or cozy nights in. Need inspiration on toppings? Check out this topping guide for exciting ideas!
Nutritional facts for the DIY Caramel Apple Bar
Caloric breakdown
When crafting your DIY caramel apple bar, understanding the caloric content can help you make mindful choices. A typical caramel apple (sliced or whole) ranges from 200 to 300 calories, depending on toppings and caramel amounts. Keep in mind that adding nuts, chocolate drizzle, or whipped cream can increase the calorie count, so consider portion sizes if you’re keeping an eye on your intake.
Alternative sweeteners and toppings
Looking for a healthier twist? Consider using alternative sweeteners like agave nectar or honey for a lighter caramel. For toppings, options like dark chocolate chips, coconut flakes, or even a sprinkle of sea salt can elevate flavor without the extra calories. You can explore more about healthier toppings and sweeteners here for delicious variations that suit your dietary preferences.
By choosing wisely, your DIY caramel apple bar can be a fun and guilt-free indulgence!
FAQs about DIY Caramel Apple Bar
Can I use different types of apples?
Absolutely! One of the best aspects of a DIY caramel apple bar is that you can customize it to your taste. While tart apples like Granny Smith add a nice contrast to the sweetness of caramel, sweeter varieties like Fuji or Honeycrisp can make for a delightful treat. If you’re feeling adventurous, try a mix for a fun flavor experience! Just be sure to wash them thoroughly and consider slicing them if your guests prefer smaller bites.
How can I store leftover caramel apples?
If you find yourself with some leftovers (which is a huge win!), storing them correctly will keep them fresh. Wrap each caramel apple in plastic wrap or place them in an airtight container to prevent them from getting too sticky. They are best enjoyed within a couple of days, but you can refrigerate them for up to a week. Just remember, the longer they sit, the softer the caramel may get. For tips on caramel preservation, check out resources like Food Safety.
What are the best toppings for a caramel apple bar?
This is where creativity really shines! Here are some favorite toppings you might consider for your DIY caramel apple bar:
- Crushed nuts (peanuts, almonds, or pecans)
- Mini chocolate chips or melted chocolate
- Crushed cookies (like Oreos or Graham crackers)
- Sprinkles for a festive touch
- Sea salt for that sweet-and-salty combo
- Coconut flakes for a tropical twist
Feel free to let your guests mix and match to find their perfect flavor profile! Perhaps even create a topping station that sparks conversations and invites experimentation—you never know what delightful combinations might emerge.
Conclusion on DIY Caramel Apple Bar
Creating a DIY caramel apple bar is not just a fun culinary project, but it also allows you to express your creativity and indulge in deliciousness with friends and family. Imagine the delight of customizing your own caramel apples with a medley of toppings! Whether you’re hosting a cozy gathering or celebrating a special occasion, a caramel apple bar is sure to impress.
Plus, it’s an easy way to bring seasonal flavors to life. So next time you’re looking for a unique dessert idea, consider setting up this delightful bar. Check out sources like Epicurious for wow-worthy variations on this classic treat. Happy caramel dipping!
PrintDIY caramel apple bar: The best indulgent treat for fall fun
Create your own caramel apple bar for the ultimate fall treat! This fun and indulgent activity will please everyone, and it’s perfect for gatherings.
- Prep Time: 20 minutes
- Cook Time: 5 minutes
- Total Time: 25 minutes
- Yield: 4 servings 1x
- Category: Dessert
- Method: No-cook
- Cuisine: American
- Diet: Vegetarian
Ingredients
- 4 medium apples
- 2 cups caramel sauce
- 1 cup chopped nuts
- 1 cup sprinkles
- 1 cup mini chocolate chips
- 1 tablespoon sea salt
Instructions
- Wash and dry the apples, then remove the stems.
- Insert sticks into the tops of the apples.
- Melt the caramel sauce according to package instructions.
- Dip each apple into the melted caramel, ensuring it’s well-coated.
- Roll the caramel-coated apples in the toppings of your choice, such as nuts or sprinkles.
- Allow the apples to cool on a parchment-lined tray.
- Serve immediately or store in the fridge.
Notes
- For a fun twist, try using different types of chocolate for dipping.
Nutrition
- Serving Size: 1 apple
- Calories: 250
- Sugar: 34g
- Sodium: 40mg
- Fat: 7g
- Saturated Fat: 3g
- Unsaturated Fat: 4g
- Trans Fat: 0g
- Carbohydrates: 45g
- Fiber: 3g
- Protein: 2g
- Cholesterol: 0mg
Keywords: DIY Caramel Apple Bar, caramel apples, fall treats, dessert bar