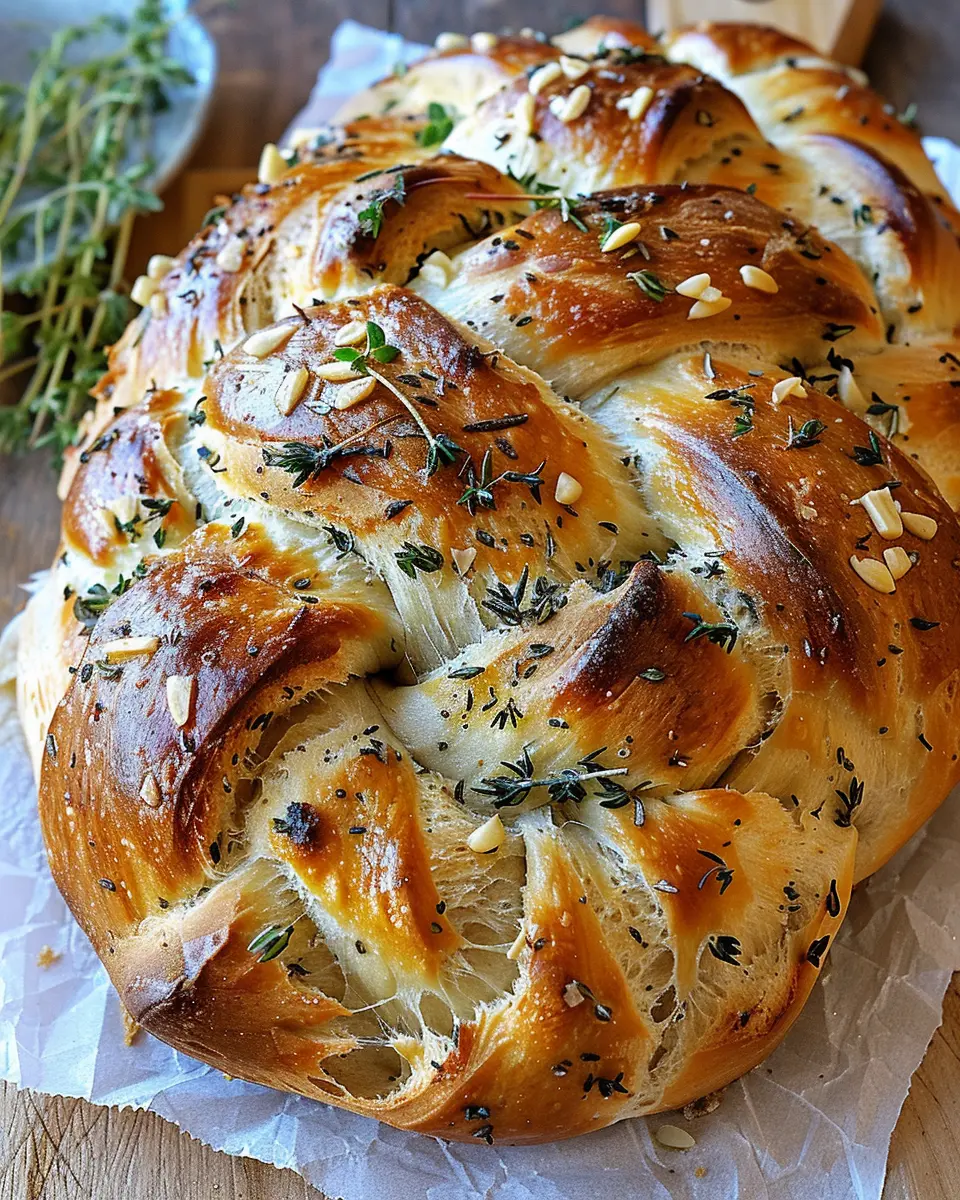
Garlic Herb Braided Bread: A Delectable Journey
Why Braided Bread is More Than Just Food
Imagine walking into a kitchen filled with the warm, inviting aroma of freshly baked bread. It’s an olfactory hug that wraps around you, pulling you in and making you feel at home. This is exactly the experience you’ll have when you whip up Garlic Herb Braided Bread. This isn’t just bread; it’s a celebration of flavors, a canvas for creativity, and a way to bring people together.
Braiding your bread isn’t only about aesthetics—it symbolizes the intertwining of flavors and cultures, much like how food connects us all. The art of bread-making can be traced back thousands of years, making it a tradition that many people find deeply comforting. This is why spending a little time on this Garlic Herb Braided Bread is worthwhile; it turns an ordinary meal into an extraordinary experience.
Crafting Your Culinary Masterpiece
Now, let’s talk ingredients. For this Garlic Herb Braided Bread, you’ll need:
- 3 cups all-purpose flour
- 1 packet instant yeast
- 1 teaspoon salt
- 1 tablespoon sugar
- 1/4 cup olive oil
- 1 cup warm water
- 4 cloves garlic, minced
- 2 tablespoons mixed dried herbs (like rosemary, thyme, and oregano)
Each of these elements plays a crucial role in creating a bread that’s not only delicious but also rich in flavor. For instance, did you know that garlic is known to boost the immune system? It’s definitely a healthy plus when you’re crafting this lovely bread!
Once you’ve gathered your ingredients, the magic begins. Mixing, kneading, and braiding the dough isn’t just a culinary task but an enjoyable experience. You might find yourself lost in thought as you go through the motions, connecting with the food and the joy it brings. Are you ready to embark on this delightful journey?
Share and Connect
As you bake your Garlic Herb Braided Bread, consider sharing it with friends or family. Nothing beats the joy of breaking bread together! You could pair it with a refreshing herbal tea or a rich chicken broth for a cozy dinner experience. Want to learn more about savory bread? Check out the Bread Baker’s Guild of America for deeper insights into bread-making traditions and techniques.
In conclusion, your journey with Garlic Herb Braided Bread is about much more than just satisfying hunger. It’s about embracing the goodness of cooking, sharing those moments with loved ones, and creating delicious memories one braid at a time.
Ingredients for Garlic Herb Braided Bread
Creating the perfect Garlic Herb Braided Bread is all about using fresh and quality ingredients. Let’s go through what you’ll need:
Essential Pantry Items
- All-purpose flour (4 cups): This forms the bread’s base.
- Instant yeast (2 ¼ teaspoons): This helps the bread rise beautifully and quickly.
- Sugar (1 tablespoon): Just a hint adds sweetness and activates the yeast.
Flavor and Texture Enhancers
- Salt (1 teaspoon): Essential for flavor!
- Olive oil (¼ cup): For richness and a slight crisp.
Herb and Spice Components
- Fresh garlic (4 cloves, minced): Adds that punchy garlic flavor.
- Dried herbs (1 tablespoon mixed thyme and rosemary works great): They bring an aromatic touch.
Optional Add-ins
- Parmesan cheese (½ cup grated): Adds a savory, cheesy layer to the bread.
Gathering these ingredients will set you on the path to delicious, homemade Garlic Herb Braided Bread. Not sure where to find quality fresh ingredients? Check out local farmers’ markets or online grocery options like FreshDirect for fresh herbs!
Remember, quality counts—it’s the secret to a bread that’s bursting with flavor! And if you want to dive deeper into bread-making tips, King Arthur Baking is an excellent resource. Happy baking!
Preparing Garlic Herb Braided Bread
Crafting your own Garlic Herb Braided Bread can be one of those blissful kitchen experiences that transforms a simple meal into something memorable. Let’s jump in and break down this delightful recipe step-by-step to help you create a beautiful loaf that’s not only visually appealing but also bursting with flavor.
Activate the Yeast
To kick things off, we need to awaken our yeast. This is a crucial first step, as it forms the foundation of our dough. In a small bowl, combine about 2 teaspoons of active dry yeast with 1 teaspoon of sugar and 1 cup of warm water (around 110°F). Allow it to sit for about 5-10 minutes. You’ll know it’s ready when it becomes frothy—this means your yeast is alive and ready to create that light, airy texture we all love in bread. If you want more detail on yeast activation, check out this guide from King Arthur Baking.
Combine Ingredients for the Dough
Once your yeast is activated, it’s time to bring everything together. In a large mixing bowl, add:
- 3 cups of all-purpose flour
- 1 teaspoon of salt
- 2 tablespoons of olive oil
- 2-3 minced garlic cloves
- A handful of chopped fresh herbs—think basil, parsley, or thyme based on your taste.
When you pour in the activated yeast mixture, mix everything until a dough begins to form. Don’t worry if it looks a bit messy at first; that’s all part of the process!
Knead and Add Cheese
Now comes the fun part: kneading! On a lightly floured surface, turn out your dough and start kneading. Aim to knead for about 8-10 minutes until it feels smooth and elastic. This is a great workout for the arms, and it’s also quite therapeutic!
If you’re like me and love a touch of cheese in your bread, this is the time to incorporate about a cup of shredded mozzarella or parmesan. Fold it into the dough as you knead, ensuring it’s well-distributed throughout. Trust me, this addition will elevate your Garlic Herb Braided Bread to another level.
First Rise: Time to Rest
Now that your dough is kneaded and beautifully smooth, let it rest. Place it in a lightly greased bowl and cover it with a damp kitchen towel. Let it rise for about an hour or until it has doubled in size. This is a good time to spend some time relaxing or preparing your favorite dipping oil to pair with the bread later.
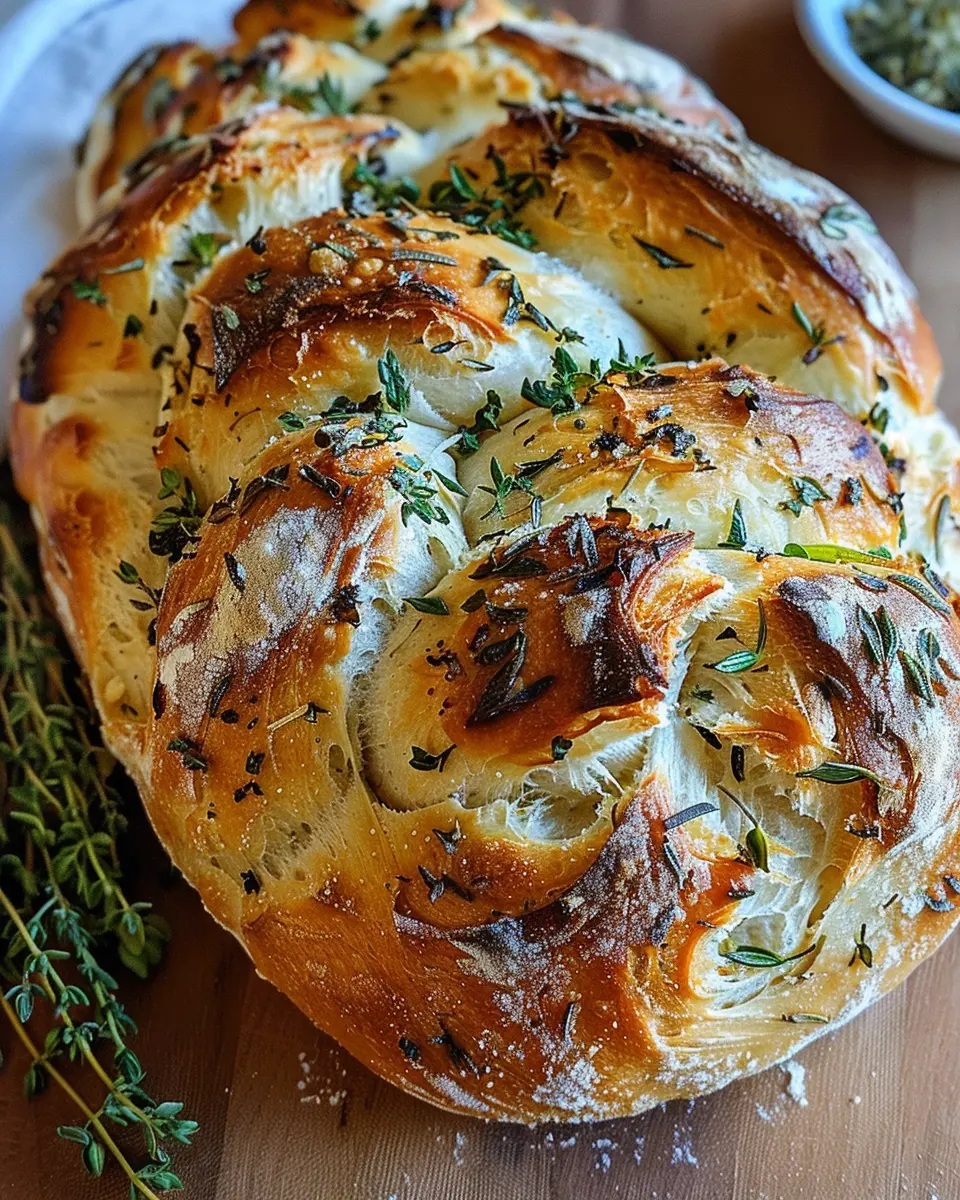
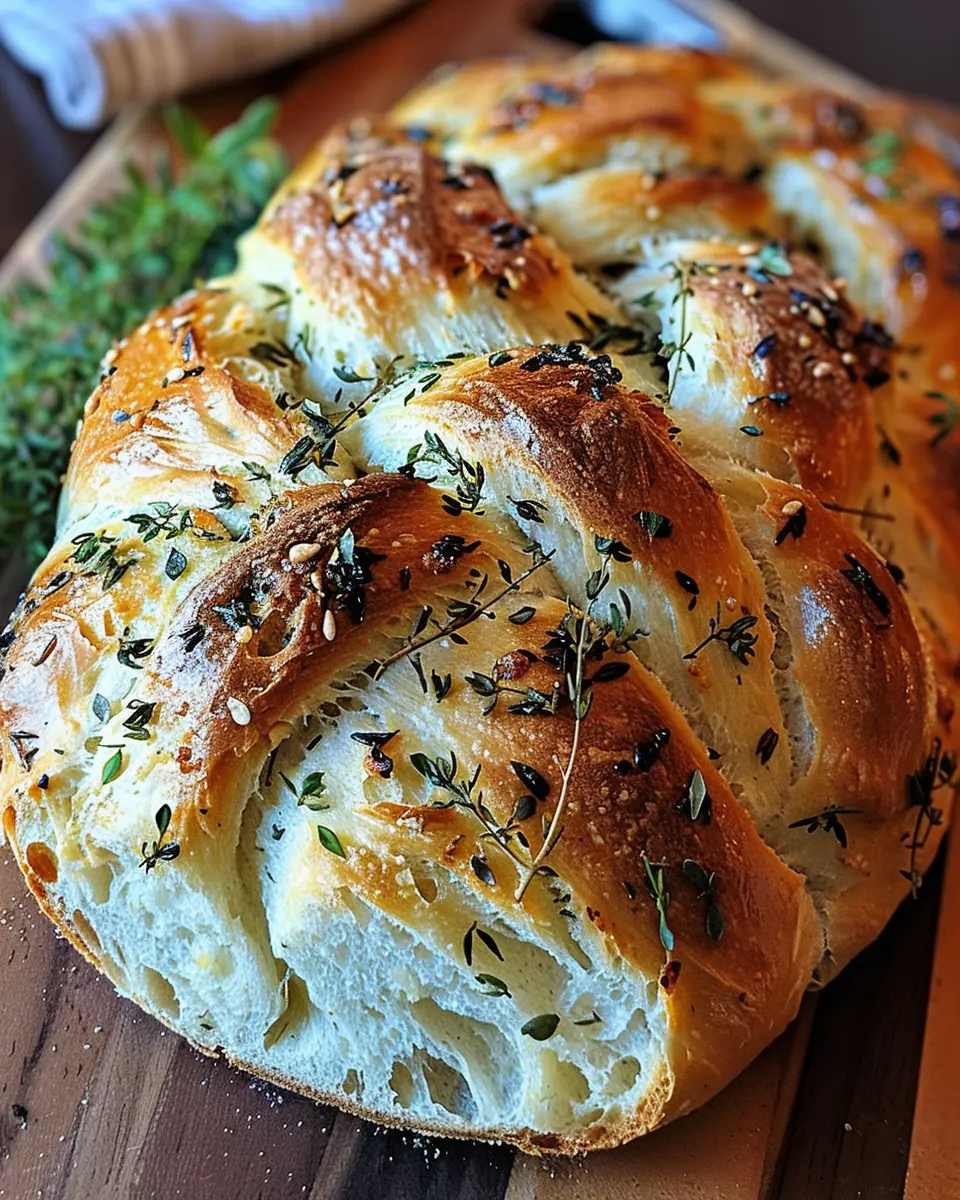
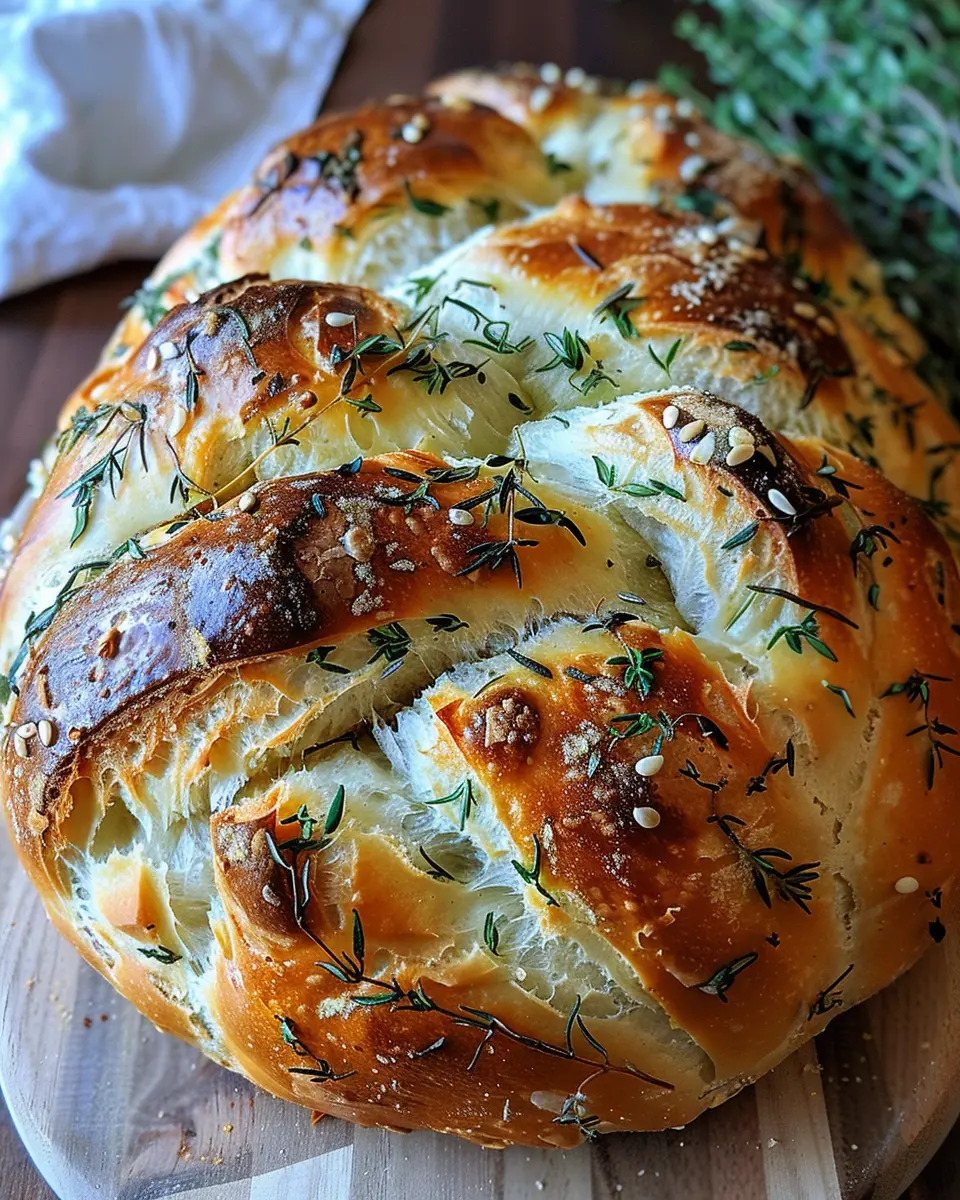
Shape and Braid the Dough
After the first rise, it’s time to shape your dough. Punch it down gently to release any air, and then divide it into three equal portions. Roll each portion into long strands, about 12-14 inches in length. Skills come into play here—begin braiding the strands together to form a lovely loaf. Don’t worry about perfection; charming imperfections are what make homemade bread so special.
Second Rise: Patience Pays Off
Place your braided dough on a baking sheet lined with parchment paper. Cover it once more with that damp towel and let it rise again for about 30 minutes. This second rise is essential; it gives the bread that fluffy quality we crave, making it all the more satisfying to bite into.
Bake and Enjoy the Aroma
Finally, it’s time to bake! Preheat your oven to 375°F (190°C). Once your bread has risen, pop it in the oven and let it bake for about 25-30 minutes, or until it’s golden brown. As it bakes, your kitchen will fill with a mouthwatering aroma that will have everyone asking, “What’s cooking?”
When it’s done, let it cool on a wire rack for a few minutes before slicing into it. Enjoy your Garlic Herb Braided Bread warm with a drizzle of olive oil or your favorite dip. Whether you’re serving it at a gathering or enjoying it solo, this bread is bound to impress.
For a final treat, consider pairing it with a homemade dipping sauce or a refreshing salad. Any way you enjoy it, you’ve just created a delicious centerpiece for your meal!
Adding a Twist with Cheese
One of the most delightful variations on Garlic Herb Braided Bread involves incorporating cheese. Imagine pulling apart warm, tender bread only to reveal gooey, melted cheese inside. Cheeses like mozzarella, cheddar, or a tangy goat cheese work beautifully. Simply fold small cubes or shredded cheese into the dough before the second rise, or sprinkle it between the layers as you braid. Not only does cheese elevate the flavor, but it also adds an irresistible texture!
Going Spicy with Red Pepper Flakes
If you’re someone who loves a bit of heat, consider adding red pepper flakes to your Garlic Herb Braided Bread. Mixing a teaspoon or two into the garlic herb butter gives the bread a subtle kick that’s sure to impress your guests. You might even pair this spicy version with a cooling dip, such as a creamy yogurt sauce, to balance the heat. It’s a fantastic addition for gatherings—everyone loves a bit of adventure in their bread!
Herbaceous Alternatives: Customize Your Flavor
Customization is easy when it comes to Garlic Herb Braided Bread. Fresh herbs like basil, thyme, or even dill can take your bread to new aromatic heights. Just chop and mix your chosen herbs into the dough or sprinkle them in while you braid. This versatile bread allows you to showcase your personal taste, and experimenting can be half the fun!
Don’t hesitate to explore these variations and find your perfect version of Garlic Herb Braided Bread. The beauty of baking lies in the freedom to express yourself, and your kitchen is the best place to start! For more ways to personalize your bread, check out this excellent resource for tips on using herbs in bread-making.
Cooking Tips and Notes
Keep it Fresh: How to Store
To keep your Garlic Herb Braided Bread fresh, let it cool completely before storing. Wrap it tightly in plastic wrap or store it in an airtight container at room temperature, where it will stay fresh for up to three days. For longer storage, consider freezing it. Slice the bread, wrap individual pieces, and place them in a freezer bag. This way, you can enjoy a slice whenever you’re in the mood!
Altering Rise Times with Instant Yeast
If you’re short on time, using instant yeast can be a game-changer for your Garlic Herb Braided Bread. Instant yeast allows for shorter rise times, meaning you can get your bread on the table faster. Just remember to adjust your flour and liquid ratios slightly, as instant yeast may absorb less moisture than traditional yeast. For extra tips on yeast activation and baking techniques, check out resources from the King Arthur Baking Company.
Incorporating these simple tips can enhance your baking experience, making your Garlic Herb Braided Bread as delightful as possible!
Serving Suggestions for Garlic Herb Braided Bread
Pairing with Dips and Spreads
Looking for the perfect accompaniments for your Garlic Herb Braided Bread? Dips and spreads can take your bread experience to the next level! Here are a few delicious options:
- Hummus: A creamy, flavorful choice that complements the garlic notes beautifully.
- Herbed Cream Cheese: Blend cream cheese with your favorite herbs for a spread that mirrors the flavors in the bread.
- Olive Tapenade: A robust mixture of olives, capers, and olive oil will add a delightful zing.
Feeling adventurous? You might try crafting a spicy aioli by mixing mayonnaise with hot sauce and minced garlic for a kick!
Making it the Star of Your Dinner Table
Want to impress your guests? Use your Garlic Herb Braided Bread as a centerpiece! Serve it with a variety of delectable sides:
- Charcuterie Board: Pair it with sliced turkey bacon, chicken ham, and an array of cheeses. This combination adds a savory flair to your meal.
- Soup: A comforting bowl of tomato basil soup or a rich butternut squash soup makes a perfect match for tearing and dipping.
- Salad: Present it alongside a fresh garden salad, topped with a light vinaigrette.
Your guests will surely be raving about this delicious addition! For an even more interactive experience, consider incorporating a bread-baking workshop or culinary class into your gatherings. Check out The Kitchn for fantastic ideas on hosting food-focused events! By making your Garlic Herb Braided Bread the star, you’re not just serving food; you’re creating lasting memories around the dinner table.
Time Breakdown for Garlic Herb Braided Bread
Preparation Time
Getting started on your Garlic Herb Braided Bread takes about 15 to 20 minutes. You’ll be mixing the dough, chopping the herbs, and prepping everything for the next steps. It’s a great time to tune into your favorite playlist or podcast!
Rising Time
Once you’ve kneaded the dough into a smooth ball, let it rise for about 1 to 1.5 hours. The dough needs to double in size, so find a nice warm spot in your kitchen. While you wait, maybe you could whip up a quick snack or browse some recipes for a delicious dip to pair with your bread.
Baking Time
The Garlic Herb Braided Bread will bake for 25 to 30 minutes. Enjoy the fantastic aroma that fills your kitchen during this time! Just be sure to keep an eye on it towards the end to ensure that golden-brown finish.
Total Time
In total, you’re looking at around 2 to 2.5 hours from start to finish. Even with the rising time, this homemade bread is well worth it and a perfect project for a Saturday afternoon. Imagine serving it fresh and warm at your next gathering or cozy dinner! For more tips on the importance of homemade bread, check out this informative article.
Nutritional Facts for Garlic Herb Braided Bread
When diving into the delightful world of Garlic Herb Braided Bread, understanding its nutritional profile can enhance your cooking experience. Here’s a quick breakdown of what to expect per serving:
Calories Per Serving
Each serving of this mouth-watering bread contains approximately 180 calories. It’s a satisfying option that won’t weigh you down, making it perfect for any meal or snack.
Carbohydrates
This braided beauty is a carbohydrate lover’s dream, with around 30 grams of carbs per serving. These carbs provide the energy you need to power through your day, whether you’re at work or unwinding at home.
Protein Content
While primarily a carbohydrate-rich food, Garlic Herb Braided Bread also offers around 5 grams of protein. Pair it with a protein-packed side, like turkey bacon or chicken ham, to create a balanced meal that will keep you feeling full and energized.
For more insights on healthy eating, check out this resource on nutritional guidelines. Enjoy baking and savoring your Garlic Herb Braided Bread!
FAQs about Garlic Herb Braided Bread
Can I use gluten-free flour?
Absolutely! If you’re looking to make a gluten-free version of your Garlic Herb Braided Bread, using a gluten-free all-purpose flour blend is a great option. Just be sure to check that your blend contains xanthan gum or add it separately for that perfect chew. The texture may vary a bit, but you’ll still have that delightful garlic and herb flavor.
What if my bread doesn’t rise?
A common concern for many bakers is dealing with bread that refuses to rise. If your Garlic Herb Braided Bread doesn’t puff up, here are a few reasons why that might happen:
- Inactive yeast: Always check the expiration date or test it in warm water with a bit of sugar to see if it activates.
- Temperature: Yeast thrives in warmth. If your kitchen is too cool, try placing the dough in a warmer spot, like near the oven or a sunny window.
- Over-kneading: While kneading is essential, too much can create tough bread.
If your bread disappointingly stays flat, it might still taste delicious, so don’t fret too much!
Can I freeze this bread?
Yes, you can freeze your Garlic Herb Braided Bread! This is perfect for meal prep or if you simply want to enjoy it later. Just let the bread cool completely, wrap it tightly in plastic wrap, and place it in a freezer bag. It can last for up to three months. When you’re ready to enjoy it, thaw it at room temperature, or warm it up in the oven for that fresh-baked aroma and taste.
For more tips on bread storage and baking, check out this comprehensive guide on bread preservation.
Conclusion on Garlic Herb Braided Bread
Making Garlic Herb Braided Bread is not just cooking; it’s a delightful experience that fills your kitchen with warm, inviting aromas. This recipe is perfect for any occasion, whether it’s a cozy dinner at home or a gathering with friends. The combination of garlic and herbs elevates the flavor, ensuring every bite is satisfying.
To enjoy this delightful dish, consider pairing it with a creamy dip or serving it alongside your favorite soup. And if you’re adventurous, try adding other toppings like Turkey Bacon or Chicken Ham to enhance your bread even further. For a deeper understanding of bread-making techniques, you might want to check out resources like the King Arthur Baking Company for expert tips.
So, why not roll up your sleeves and give it a try? This Garlic Herb Braided Bread could just become your new favorite staple!
PrintGarlic Herb Braided Bread: The Best Homemade Delight to Enjoy
A delightful homemade bread infused with garlic and herbs, perfect for any occasion.
- Prep Time: 15 minutes
- Cook Time: 30 minutes
- Total Time: 1 hour 45 minutes
- Yield: 1 loaf 1x
- Category: Bread
- Method: Baking
- Cuisine: Italian
- Diet: Vegetarian
Ingredients
- 4 cups all-purpose flour
- 1 tablespoon sugar
- 1 tablespoon salt
- 1 tablespoon instant yeast
- 1 cup warm water
- 3 tablespoons olive oil
- 2 cloves garlic, minced
- 2 tablespoons fresh parsley, chopped
- 1 teaspoon dried oregano
- 1 teaspoon dried basil
Instructions
- In a mixing bowl, combine warm water, sugar, and yeast. Let it sit for 5 minutes until foamy.
- Add flour, salt, olive oil, garlic, and herbs to the yeast mixture. Mix until a dough forms.
- Knead the dough on a floured surface for about 10 minutes until smooth and elastic.
- Place the dough in a greased bowl, cover, and let it rise in a warm place until doubled in size, about 1 hour.
- Preheat the oven to 375°F (190°C).
- Punch down the dough and divide it into three equal pieces. Roll each piece into a long rope.
- Braid the ropes together and place on a baking sheet lined with parchment paper.
- Cover the braid and let it rise for another 30 minutes.
- Bake for 25-30 minutes until golden brown and sounds hollow when tapped.
- Let cool before slicing and serving.
Notes
- For a golden crust, brush the braid with an egg wash before baking.
- Substitute herbs to your preference for different flavors.
Nutrition
- Serving Size: 1 slice
- Calories: 150
- Sugar: 1g
- Sodium: 300mg
- Fat: 4g
- Saturated Fat: 0.5g
- Unsaturated Fat: 3g
- Trans Fat: 0g
- Carbohydrates: 25g
- Fiber: 1g
- Protein: 5g
- Cholesterol: 0mg
Keywords: Garlic Herb Braided Bread, Homemade Bread, Bread Recipe